Tuesday, June 10, 2008

Debug into .Net from VB6

If you've got a VB6 app that is calling a .Net component, and you want to use the VS debugger on the .Net component then you need do the following:


  • Start the VB6 app

  • Set a break point in your .Net app

  • In VS, click on "Tools-Attach to Process..." and select the VB6 application/IDE. This will start your component running in VS.


Now, back in VB6, click the button (or do the action) that activates your .Net component. It will switch into the VS debugger on your breakpoint. Nice!

Be careful about which version of your .Net Dll is registered on the machine (release/debug). If you hav ethe relase one activated then it won't give you any debugging - it does warn you though. To get your debug one back, switch VS back to debug build, close your VB6 app/IDE, and rerun your .Net app. This will re-register the debug version.

For more details, try this.

Update: Very, very, VERY, VERY IMPORTANT!!!! You must enable "Managed Code" debugging when you attach to the process. So, in the "Attach to Process" window, you might have "Automatic: Native Code" showing. This didn't work for me - presumably because my Dll is managed, not native. So click the "Select..." button next to the "Attach to:" and choose "Managed" and "Native". Now attach to VB6.exe and all should work!

Thursday, June 5, 2008

C# Progress/Busy Window

I've been playing around with using a C# progress window. For testing I setup a project that takes three different approaches. I used a simple XML serialisation project as a base, and added in some sleep commands to make the serialisation command take about 10 seconds. The first approach uses a simple form (which doesn't work very nicely), then second uses a simple form with a background thread, and the third uses a form with a cancel button and a progress bar with a background thread.

The upshot is, that you need to use a BackgroundWorkerProcess. You need to encapsulate the stuff you want to do in the background into a single function; you need to identify where your bottleneck is. You send your job, that is going to take some time, to a background worker thread, and that keeps the UI responsive; it makes sure that your "I'm busy right now" window stays refreshed. There are two key things you need to do to get this to work:

1. Make sure that your work to be done in the background, doesn't try to touch the user interface. If you need to show progress then you can use the backgroundWorker.Progress method. Your background process should do its work and then return the data (via e.Result) which can then be populated onto the form if required.

2. Make sure you lock down the UI when you launch the work. The UI will remain active and you don't want the user to open a new screen or start the same update again etc, so you need to disable these buttons as required.

One thing you might want to do if you are waiting on a single network request (and therefore can't really determine % complete for a progress bar) is to display an animation - like some whirring cogs or some papers shuffling.

Wednesday, June 4, 2008

C# Converting a Class to XML

Using a class in C# to hold data is the right idea. XML is just a transport mechanism and should only be used at the boundaries of your application. So, as soon as you grab a chunk of XML from somewhere you should turn it into a class. Similarly, when you want to send some data somewhere, encapsulate the data in a class, and then serialise the class to XML. This way, if you decide to get rid of XML and use INI files, or CSV files, or YAML files then you don't need to change your core application - you only change the routines that serialise and deserialise the class.

Q. How to easily turn a class into XML?

A. For a simple class setup, you only need about four lines of code. For a user-defined class called "cls":


XmlSerializer serializer = new XmlSerializer(cls.GetType());
StringWriter writer = new StringWriter();
serializer.Serialize(writer, cls);
string xml = writer.GetStringBuilder().ToString();

Tuesday, June 3, 2008

CenterParent for a non-Modal Form in C#

I'm using a non-modal form to display a progress/busy/working dialog while a form is busy doing something. Unfortunately, the StartPosition=CenterParent, which works fine via Form.ShowDialog(), doesn't seem to work when a form is display via Form.Show(). I get around this by centering the form in the form_load method via:


private void frmBusy_Load(object sender, EventArgs e)
{
// centerparent not workin for a ".Show" form,
// so set position manually.
this.Location = new System.Drawing.Point(
this.Owner.Location.X +
(this.Owner.Width - this.Width) / 2,
this.Owner.Location.Y +
(this.Owner.Height - this.Height) / 2);
}

Friday, May 23, 2008

iPhone Screenshots

The iPhone has a built in screen shot app.

Activating the screenshot function is a matter of editing ~/Library/Preferences/com.apple.springboard.plist so that it contains a Boolean value called SBMobileScreenshotr that is set to true (notice the strange r at the end, not a typo!). I used sftp, then the Property List Editor on the Mac, then sftp'ed it back. Then restart the SpringBoard.

Use the following super-secret key combination: Hold down the Home key and toggle the mute switch. Your screen flashes white, a screen shot appears on your camera roll.

I pasted some of this info directly from here and here. Very handy!


Tuesday, May 20, 2008

Sending an SMS to the WM5 Emulator

If you need to send a TXT message to your WM5 emulator, then, from the emulator, send a message to the number 0010001. Immediately after the TXT is sent, it will be sent back to your phone as if it came from that number.

For other handy emulator numbers, check here. Here are some of the special numbers mentioned:


Voice numbers: 7272470, 7272979, 7272620, 7272917, 7272688, 7272263, 7274390, 7274388, 7274386, and 7274389

Data numbers: 7272455, 7272931, 727343, and 7273432

Always busy: 7272024

Never answer: 7272773

Emergency: 911, 112, 08, 999

SMS: 0010001 0010002

Tuesday, May 13, 2008

Creating a COM Proxy in .Net

I've got a VB6 COM component that is being used by lots of other applications: VB6 apps, Word Add-ins, Outlook add-ins, Outlook forms, VBScript libraries etc. I want to upgrade this to .Net so that (a) we are reducing our dependence on VB6, and (b) we can start using some of the cool new .net capabilities and (c) new .Net components can talk to this component via standard .Net methods rather than using COM.

The idea is to break this component into two separate .Net components. The first will be a proxy component which implements all of the original methods and properties from the VB6 component, and implements the same COM interface, so it can be swapped in for the old component. It won't do any work, but instead will invoke methods on the second component to do the work. The second .Net component will be a .Net assembly written in the proper .Net fashion that does all of the work that the old VB6 DLL used to do. New .Net applications can make calls directly into the second component and by-pass the COM interface.

So how do we create this COM facade? The way I ended up doing it was to extract the type library from the VB6 component, generate a .Net assembly that defines the interfaces in CLR metadata, and then created a .Net assembly to override the interfaces.
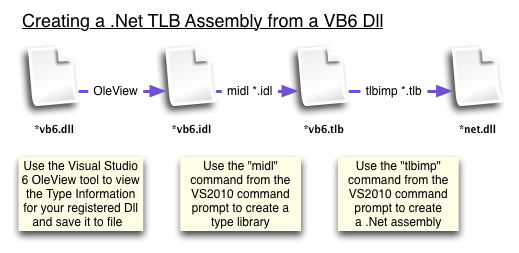
vb6-to-net-typelibrary-dll.jpg

The steps for this are:

1. On a machine which has your VB6 COM component registered and Visual Studio 6.0, fire up the OLEView tool.

2. Find your VB6 component. I looked under "Automation Objects" for the ProgId which is the "MyComp.ClassA" you use when you do a CreateObject("MyComp.ClassA") in VB6.

3. Select "Object-View Type Information" to display the "ITypeLib Viewer". Your IDL is in the right-hand pane.

4. Save the IDL by clicking the save button. You now have a "MyComp.IDL" file.

5. Fire up the VS2008 command prompt and navigate to your IDL file.

6. Type "MIDL MyComp.IDL" to generate a type library. I needed to reorder some of the things in the IDL to get it working. You will now have a "MyComp.TLB" file.

7. Create your .Net assembly by typing "tlbimp MyComp.Tlb /out:MyCompTlbAssembly.dll". This will generate a "MyCompTlbAssembly.dll" file. This is a .Net assembly that defines your interface. Now we need to override it and implement our new code.

8. Create a new .Net Class project. I called mine "MyCompProxyNET".

9. Add a reference to your recently create "MyCompTlbAssembly.dll" by using "Project-Add Reference" and then going to the "Browse" tab and finding your dll.

10. Create a class for the first class from your VB6 component that you want to override, eg ClassA. I called my class "ClassAProxy".

11. Add an import of the System.Runtime.InteropServices, set your prog id to match the original VB6 prog id, and implement your interface. So you have something like this:


using System;
using System.Runtime.InteropServices;

namespace MyCompProxyNET
{
[ProgId("MyComp.ClassA")]
public class ClassAProxy : MyCompTlbAssembly.ClassA
{
}
}


12. Now implement the interface for this class. VS2008 will generate stubs for you if you right click the interface ("MyCompTlbAssembly.ClassA" in this case) and choose "Implment Interface". Nice!!

13. Almost there, now we just have to make this COM visible. Under "project-Properties-Application-Assembly Information", check the "Make assembly COM-Visible" box, and "OK". Under "Project-Properties-Build" check the "Register for COM Interop" box.

14. Build your solution. Your .Net assembly is now the registered component for that ProgId. You can verify this by looking up the ProgId in the registry under HKEY_CLASSES_ROOT and following the Clsid to the HKEY_CLASSES_ROOT/CLSID/{your clsid}. You can see that the name of the .Net component will be displayed in the "InProcServer32" key. Previously your VB6 dll would have shown up in here.

Run one of your apps that used the old VB6 component and you should get a nice "The method or operation is not implemented" error message. This error is thrown by the .Net stubs you created in step 12. Just put some real code in your stubs and away you go!